Looking to charge your Apple Magic Mouse? This article guides you through the exact steps to power up your device efficiently. From connecting the right cable to checking the charging status, we provide the essentials on how to charge an Apple mouse without the fluff, ensuring you can quickly return to your work or play.
Key Takeaways
- Before charging an Apple Magic Mouse, it’s important to check the battery status via your Mac’s system settings and disconnect it from Bluetooth to prevent potential disconnections and unintended inputs.
- The Solumics Case enhances the ergonomic comfort of the Apple Magic Mouse, making it more comfortable for extended use by elevating the wrist and reducing hand fatigue without adding significant weight or compromising design.
- Choose the correct charging cable (USB-C to Lightning or Lightning to USB) based on your Mac’s ports, and for optimized charging, use an Apple-provided cable. Ensure the mouse is connected properly, and note that a full charge takes about two hours, with the option of a quick charge providing hours of use in just minutes.
Preparing Your Apple Magic Mouse for Charging

Preparing your Apple Magic Mouse for charging is essential for maintaining its optimal functionality. The first step in this process is understanding the mouse’s battery status. You can determine the need for charging or monitor its progress via your Mac’s battery indicator.
But before you plug in that Lightning Cable, there’s one more thing you need to do - disconnect the Magic Mouse from Bluetooth. This simple step helps prevent potential issues such as intermittent disconnections and unintended inputs, thereby conserving the battery’s charge cycle.
Locating the Battery Status
The battery status of your Magic Mouse can be found easily with just a few clicks on your Mac. If you have the Bluetooth icon in the menu bar enabled, you can check the battery percentage directly there. Otherwise, you can access this information through the system settings or control center of your Mac, which provide detailed insights of your devices.
To do this, follow these steps:
- Access the Menu Bar
- Navigate to Control Center and click the Control Centre Icon

3. Select the option to show the Bluetooth icon

This icon gives you a view of the battery status of your Magic Mouse, as well as the battery status of your other device if it’s a paired Bluetooth device.
Disconnecting Before Charging
It is advisable to disconnect your Magic Mouse from Bluetooth before you begin the charging process. This simple step can resolve issues such as intermittent disconnections and prevent unintended inputs, thereby conserving the battery’s charge cycle.
To disconnect your Magic Mouse from Bluetooth, follow these steps:
- Open the System Preferences /Settings on your Mac.

2. Open the Bluetooth settings.

3. Locate the Magic Mouse in the list of paired devices.
4. Click on the "X" next to the Magic Mouse to remove it from the list

This ensures a smooth charging process and helps maintain the longevity of your device.
Enhancing Your Apple Magic Mouse Experience with Solumics Case

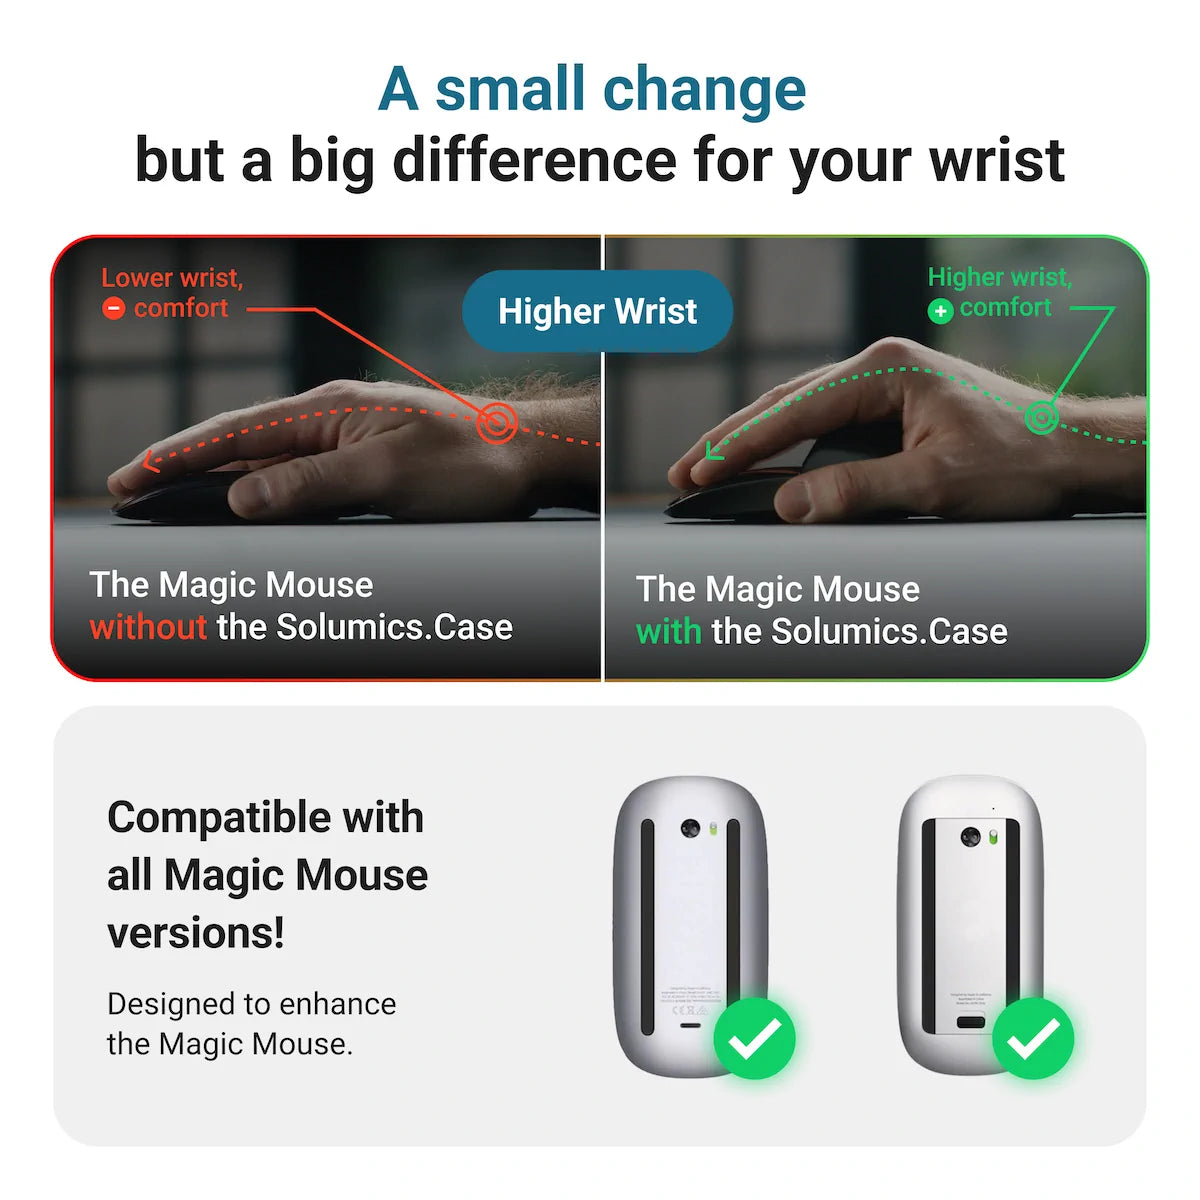
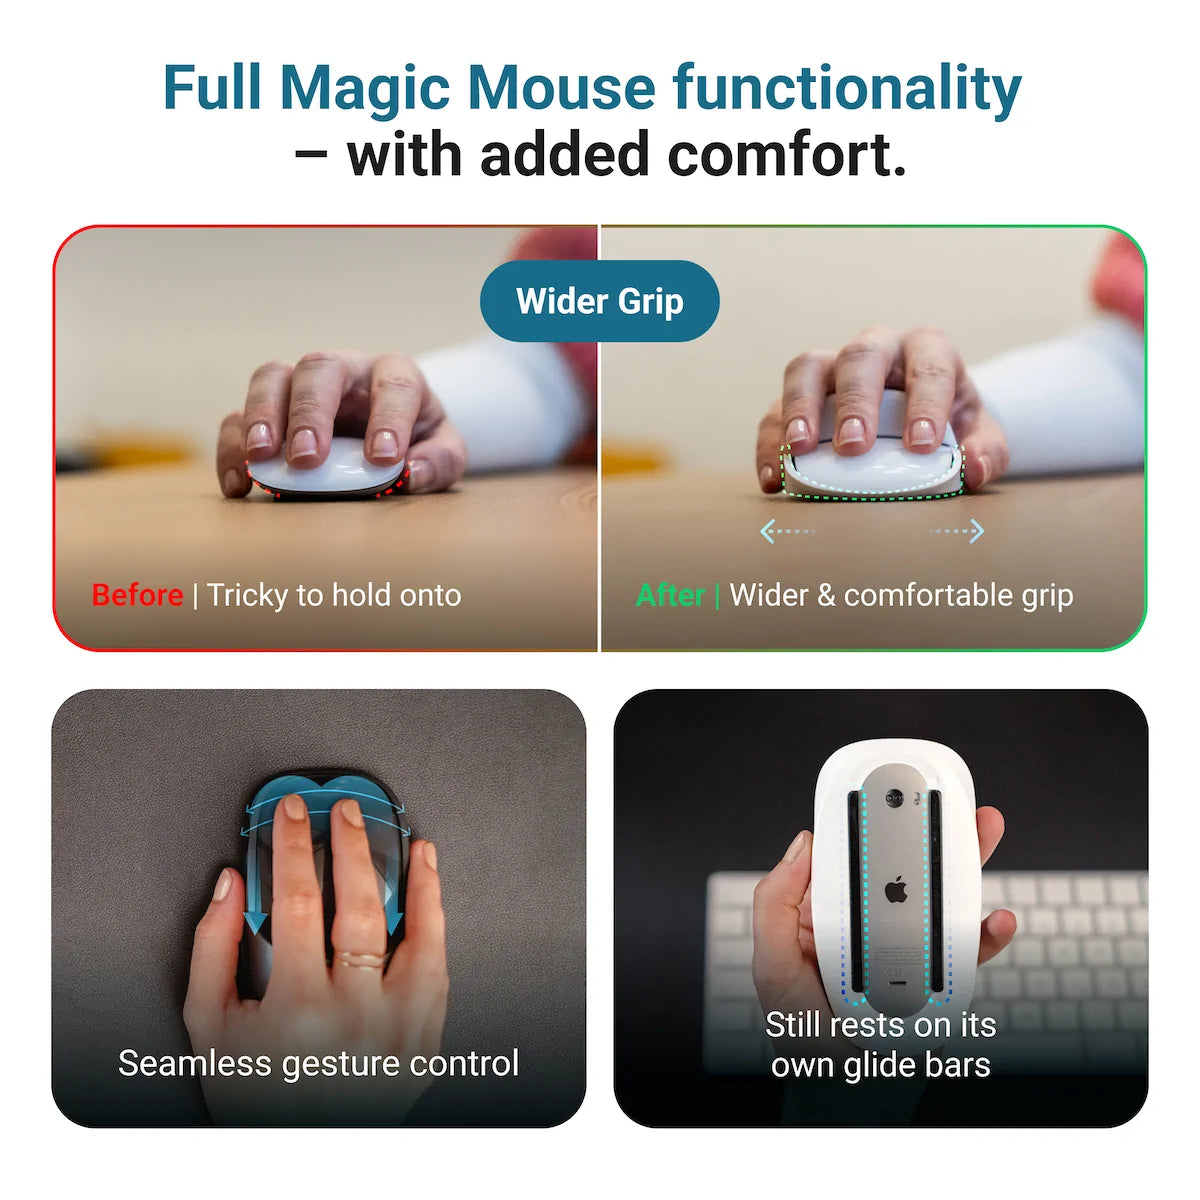
While the Apple Magic Mouse is a marvel of design and functionality, users often find this Apple device uncomfortable during extended periods of use. This is where the Solumics Case comes in, offering an ergonomic solution that enhances your Magic Mouse’s grip and overall comfort.
The Solumics Case is the world’s first ergonomic case designed specifically for the Magic Mouse. It integrates seamlessly with the mouse, aiming to improve the overall user interaction without adding significant weight. The design contributes to a more comfortable handling of the mouse, making it an invaluable tool in your workflow.
Benefits of Using Solumics Case
The Solumics Case3 enhances your Magic Mouse experience with numerous benefits. The case is designed to elevate your wrist, providing a more comfortable experience and improving the mouse’s overall ergonomics.
The elevated palm area of the Solumics Case offers the following benefits:
- Reduces hand fatigue, making long hours of mouse usage more comfortable
- Adds minimal weight to the Magic Mouse, ensuring smooth, easy maneuvering
- Doesn’t compromise the sleek design or gesture control of the Magic Mouse
These enhancements are made possible by the high-quality plastic material of the Solumics Case.
Installing the Solumics Case
The installation of the Solumics Case is straightforward and easy. The case is compatible with all versions of the Magic Mouse, making it a versatile accessory for any Apple user.
Attaching the case to your Magic Mouse can be done quickly in less than three seconds. The case is designed to fit the Magic Mouse perfectly, ensuring the mouse’s stability and protection while maintaining its functionality.
With the Solumics Case, you’re just a few seconds away from a more comfortable Magic Mouse experience.
Finding the Right Cable and Power Source

With your Magic Mouse ready for charging and its comfort enhanced by the Solumics Case, you can now proceed with the charging process. The first step is choosing the right cable for your Magic Mouse.
The Magic Mouse 2 can be charged using either a USB-C to Lightning Cable. Alternatively, it can also be charged using a Lightning to USB Cable. The choice depends on the ports available on your Mac. Connect the Lightning end of the selected cable to the mouse and the other end to either a USB-C or USB port on your Mac.
Choosing the Correct Cable

The type of cable you choose for your Magic Mouse should be based on the ports your Mac features. If your Mac has USB-C ports, opt for a USB-C to Lightning Cable. If it has USB ports, go for a Lightning to USB Cable.
While both cables can be used to charge your Magic Mouse, they differ in their capabilities. USB-C cables can deliver up to 100W of charging power with USB Power Delivery, reaching up to 240W with enhanced versions. On the other hand, Lightning cables are limited to a 2.4 amps current.
For charging your Magic Mouse, it’s recommended to use an Apple-provided USB-C to Lightning Cable or Lightning to USB Cable.
Selecting an Appropriate Power Source

Once you’ve selected the right cable, your next task is to choose a suitable power source. This could be either a wall adapter, a wall socket, or your Mac’s USB port.
A USB power adapter typically provides a more consistent power source than a computer’s USB port and can offer a faster charge, given it’s the appropriate wattage. However, if you don’t have a USB power adapter, you can use your MacBook Pro’s USB ports to charge your Magic Mouse. Just note that charging efficiency may vary based on the MacBook model and its power output.
Charging Your Apple Magic Mouse: A Step-by-Step Process

With your Magic Mouse prepared for charging, the Solumics Case installed, and the right cable and power source chosen, you can now begin charging your device. The charging port for the Magic Mouse is located on the underside of the mouse.
Begin the charging process by:
- Inserting the Lightning end of the charging cable into the port
- Connect the USB end to your selected power source
- You will hear a click sound when the Lightning cable is properly connected to the Magic Mouse.
Plugging In the Lightning Cable

Initiate the charging process of your Magic Mouse by following these steps:
- Plug in the Lightning Cable.
- Locate the Lightning port on the underside of the mouse.
- Insert the Lightning end of the USB-C to Lightning cable into the port.
Make sure the other end of the cable is connected to your chosen power source.
Ensuring Proper Connection
A proper connection between your Magic Mouse and the Lightning Cable is essential for successful charging. After plugging in the cable, observe the battery indicator to confirm that the device is charging.
If the Magic Mouse does not appear to be charging, try the following troubleshooting steps:
- Rotate the Lightning connector 180 degrees to establish a better connection.
- Ensure the charging port is free from dust or debris, which can hinder the connection. For comprehensive cleaning instructions for your Magic Mouse, check out our Guide How to clean the Magic Mouse.
- Turn on the Magic Mouse and ensure that the power switch shows green, indicating a successful power connection.
Optimizing Charging Time and Usage

By optimizing the charging time and usage of your Magic Mouse, you can maximize the performance of your device. The Magic Mouse 2 typically takes about two hours to fully charge, and a full charge lasts around a month with average daily usage.
But, it’s not just about how long the Magic Mouse lasts after a full charge. It’s about how you can get the most out of each charge and how long to charge the Mac mouse in general. And that’s where understanding charging duration and maintaining battery health come in.
Understanding Charging Duration
Being aware of your Magic Mouse’s average charging duration enables effective planning of your charging routine. While a full charge takes an average of two hours, you can also opt for a quick charge if you’re pressed for time.
A quick charge is a handy feature when you need a little more juice to finish your workday or current task. Just a couple of minutes of charging can give you eight-to-nine hours of battery life, ensuring your battery level stays optimal. This way, you can stay productive without having to wait for a full charge, thanks to the built in battery. Additionally, keeping an eye on the charging status can help you manage your device’s power more efficiently.
Maintaining Battery Health
Preserving the battery health of your Magic Mouse is key to its lifespan. One of the best ways to keep your battery healthy is by avoiding constant charging. Instead, charge the mouse as needed, which is usually about a month on a single charge. For more detailed insights on battery duration and tips for extending battery life, check out our blog post on how long the Magic Mouse battery lasts.
Aside from this, avoid exposing your Magic Mouse to extreme temperature environments as it could harm the battery health. Taking these steps can ensure that your Magic Mouse’s rechargeable batteries stay in good shape, providing you with a seamless user experience for a longer time.
Summary
We’ve covered a lot of ground in this guide, from preparing your Magic Mouse for charging and enhancing its comfort with the Solumics Case to choosing the right cable and power source, and finally, charging the device. By following these steps, not only will you ensure that your Magic Mouse is always ready for use, but you’ll also have a more comfortable and efficient user experience. So, are you ready to make the most of your Apple Magic Mouse?
Frequently Asked Questions
To check the battery status of your Magic Mouse, access the Menu Bar on your Mac, click the Apple menu, choose System Settings, navigate to Control Center, and select the option to show the Bluetooth icon. This will allow you to view the battery status of your Magic Mouse.
The Solumics Case is an ergonomic case designed to enhance the grip and comfort of the Magic Mouse. It is the world's first of its kind.
You should use a USB-C to Lightning Cable if your Mac has USB-C ports, or a Lightning to USB Cable if it has USB ports. This will ensure proper charging for your Magic Mouse.
It takes about two hours to fully charge the Magic Mouse 2.
To maintain the battery health of your Magic Mouse, avoid keeping it constantly plugged in and avoid exposing it to extreme temperatures. This will help prolong the lifespan of your battery.